
DIY Guide to Adding Garage Outlets & Conduit: Surface-Mount Wiring Without Cutting Walls (2026)
Surface-mounted PVC conduit transforms garage electrical upgrades from multi-day demolition projects into weekend-friendly installations that preserve finished walls while delivering code-compliant power distribution. Unlike hidden wiring that demands cutting drywall, fishing cables through insulation, and patching, surface conduit routes power exactly where you need it—along walls, across ceilings, and around obstacles—with nothing more than a miter saw, PVC cement, and basic hand tools. The tradeoff is aesthetics: exposed conduit looks utilitarian rather than architectural, which makes it ideal for garages, workshops, and basements where function outweighs finish.
This guide walks through a complete garage electrical expansion using PVC conduit, metal junction boxes, and GFCI-protected outlets, covering everything from circuit load calculations (how many outlets and lights a 15-amp or 20-amp circuit can safely support), to wiring diagrams for switched ceiling outlets, proper grounding techniques for non-conductive conduit systems, and the step-by-step process of measuring, cutting, cementing, and securing PVC runs that pass inspection and deliver reliable power for decades.
Executive Key Takeaways
- Circuit capacity limits outlet count: A 15-amp circuit supports 1,440 watts continuous load (10 receptacles conservatively); a 20-amp circuit supports 1,920 watts (13 receptacles). Never exceed 80% of circuit capacity for continuous loads.
- PVC conduit requires separate ground wire: Unlike metal conduit that self-grounds when bonded, PVC is non-conductive and demands a dedicated green or bare copper ground wire bonded to every metal box and fixture.
- Support spacing for PVC: 36 inches maximum: Straps must be within 36 inches of boxes and spaced no more than 36 inches apart to prevent sagging, per NEC requirements for rigid PVC.
- Wire gauge must match breaker amperage: Use 14 AWG wire for 15-amp circuits, 12 AWG for 20-amp circuits. Installing a 20-amp breaker on 14-gauge wire creates a fire hazard because the wire will overheat before the breaker trips.
- GFCI protection extends through "load" terminals: Connecting downstream outlets to the GFCI's load side provides ground-fault protection to the entire branch, protecting against shock in damp garage environments.
Table of Contents
- 1. Why Surface-Mounted Conduit Makes Sense for Garages
- 2. Planning the System: Load Calculations and Circuit Capacity
- 3. Materials and Tools: What You'll Actually Need
- 4. Safety First: Power Shutdown and Verification
- 5. Starting Point: Adding a Box Extender
- 6. Measuring, Cutting, and Cementing PVC Conduit
- 7. Installing Boxes, Straps, and Support Hardware
- 8. Running Wire Through Conduit: Push vs. Pull Techniques
- 9. Wiring Outlets, Switches, and GFCI Protection
- 10. Grounding Metal Boxes in PVC Conduit Systems
- 11. Adding Ceiling Lights and Fluorescent Fixtures
- 12. Testing, Inspection, and Final Checkout
1. Why Surface-Mounted Conduit Makes Sense for Garages
Traditional wiring methods demand cutting into walls, drilling through studs, fishing cables through insulation, and patching drywall—labor-intensive processes that turn simple outlet additions into multi-day projects. Surface-mounted conduit eliminates all of that by routing power on the surface of finished walls and ceilings using rigid plastic or metal pipe secured with straps. You gain complete control over cable routing, can add or modify circuits later without cutting anything open, and achieve code-compliant installations without specialized fishing tools or drywall repair skills.
The aesthetic tradeoff is obvious: conduit is visible and utilitarian. In living spaces, this is unacceptable. In garages, workshops, utility rooms, and unfinished basements, it's practical and expected. PVC conduit offers additional advantages over metal: it's cheaper, lighter, easier to cut (a miter saw slices through it cleanly), immune to rust and corrosion, and requires no pipe-bending skills. The primary disadvantage is that PVC doesn't conduct electricity, requiring you to pull a separate ground wire and bond it to every metal box and fixture—a step that metal conduit systems handle automatically through the conduit itself.
2. Planning the System: Load Calculations and Circuit Capacity
Understanding Circuit Capacity Limits
Before adding outlets or lights, determine how much load your existing circuit can support. For continuous loads (anything running three or more hours), the NEC limits you to 80 percent of the circuit's rated capacity to prevent breaker nuisance tripping and wire overheating. A 15-amp circuit at 120 volts supplies 1,800 volt-amperes (VA) total, but continuous load capacity is only 1,440 VA. A 20-amp circuit supplies 2,400 VA total with a 1,920 VA continuous capacity.
Calculating Fixture Count
For non-dwelling commercial applications, the NEC assigns 180 VA per receptacle outlet for load calculation purposes. Dividing 1,440 VA by 180 VA yields 8 receptacles for a 15-amp circuit; dividing 1,920 VA by 180 VA yields approximately 10 receptacles for a 20-amp circuit. Residential garage circuits typically don't follow this prescriptive calculation, but using it provides a conservative safety margin. For lighting, add up fixture wattages and ensure the total stays below the continuous capacity limit.
Wire Gauge Selection
Match wire gauge to the circuit breaker amperage, never the other way around. Use 14 AWG copper wire for 15-amp circuits and 12 AWG copper wire for 20-amp circuits. Installing a 20-amp breaker on 14-gauge wire is a fire hazard: the thin wire will overheat and potentially ignite before the breaker trips. Always verify the existing circuit breaker amperage and wire gauge before extending the circuit.
3. Materials and Tools: What You'll Actually Need
PVC Conduit and Fittings
Half-inch PVC electrical conduit (not plumbing pipe—they're different) is standard for residential branch circuits. You'll need 10-foot straight lengths, 90-degree elbows (bends), couplings for joining straight runs, and male adapters for connecting PVC to metal boxes. Buy PVC cement specifically labeled for electrical conduit, plus primer if required by the manufacturer.
Metal Boxes and Covers
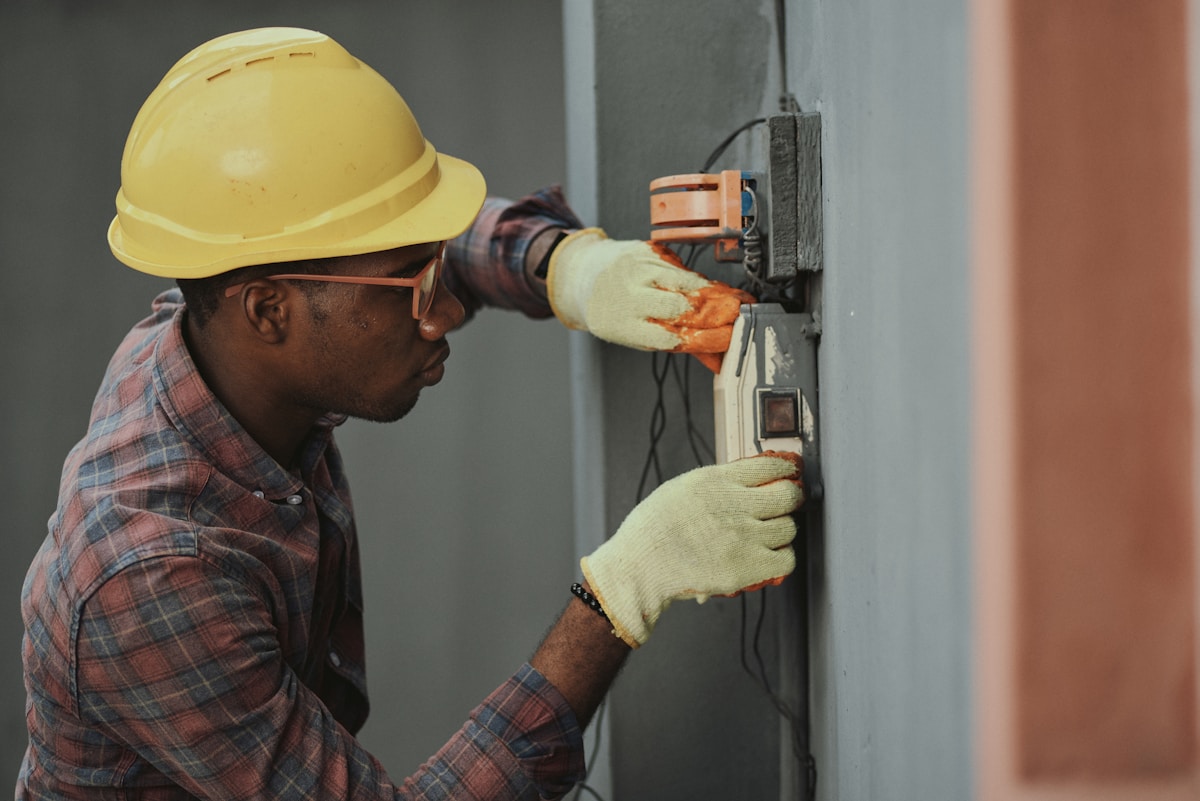
Four-inch square metal junction boxes (1-1/2 inches deep) are versatile and provide room for wire connections. You'll need raised covers to mount receptacles and switches flush with the box face. For existing outlet boxes, a box extender converts a single-gang box to accept 1/2-inch conduit knockouts. Locknuts secure male adapters inside boxes, and plastic bushings protect wire insulation at entry points.
Wire and Grounding Hardware
Buy individual spools of THHN wire in black (hot), white (neutral), and green or bare copper (ground) matching the required gauge (14 AWG or 12 AWG). You'll need wire strippers, lineman's pliers, a non-contact voltage tester, and a plug-in GFCI outlet tester. Don't forget green grounding screws for bonding ground wires to metal boxes.
4. Safety First: Power Shutdown and Verification
Turn off the circuit breaker controlling the outlet or fixture you'll extend from. Use a non-contact voltage tester to verify power is off by holding the tester near each wire in the box—it will beep or light up if voltage is present. Remove the existing outlet or fixture carefully, and test again with the voltage detector touching each bare wire and terminal screw. Never trust the breaker label alone; circuits are sometimes mislabeled or shared unexpectedly.
Leave the breaker off and tape a note over it so nobody flips it back on while you're working. If aluminum wiring is present (silver-colored conductors rather than copper), stop and hire a licensed electrician certified for aluminum wiring; the connection techniques differ and improper connections create fire hazards.
5. Starting Point: Adding a Box Extender
Most existing outlet boxes are single-gang boxes with limited knockout options. A box extender—typically a single-gang to 4-inch square adapter—mounts over the existing box and provides larger knockouts compatible with 1/2-inch conduit fittings. Screw the extender to the existing box using the existing outlet mounting screws. Remove the appropriate knockout (the smaller 1/2-inch size, not the large trade-size knockouts) by bending it slightly with pliers, then twisting it free.
6. Measuring, Cutting, and Cementing PVC Conduit
Measuring Techniques
Hold the next box in its intended position and measure the distance between boxes. Subtract 1/2 inch total (1/4 inch per end) to account for the depth of the male adapters that will glue into each conduit end. Alternatively, dry-fit a male adapter or elbow onto one conduit end, hold it against the box, and mark the opposite end for cutting. This eliminates math errors.
Cutting and Deburring
Use a miter saw, hacksaw, or dedicated PVC conduit cutter for clean cuts. After cutting, ream the inside edge with a utility knife handle or deburring tool to remove plastic burrs that could damage wire insulation during pulling. Run your finger inside the cut end—if you feel sharp edges, remove them.
Cementing Joints
Apply PVC primer to the outside of the conduit end and inside of the fitting (if required by the cement manufacturer). Swab PVC cement inside the fitting, press the conduit into the fitting, twist a quarter turn to spread the cement evenly, and hold for 10–15 seconds until the joint sets. Work quickly; PVC cement sets fast. Let joints cure for the time specified on the can before pulling wire or stressing the connection.

7. Installing Boxes, Straps, and Support Hardware
Mounting Metal Boxes
Hold the box in position with conduit attached and mark mounting holes through the back of the box onto the wall. Remove the box and install screw-in drywall anchors at the marks (unless you hit solid wood, in which case drive screws directly). Screw the box to the wall, ensuring it sits flush and level. Install a metal locknut on each male adapter threading through the box knockout, tightening it snugly with pliers.
Support Strap Placement
PVC conduit must be supported within 36 inches of every box and at intervals no greater than 36 inches along straight runs. Use snap-type PVC straps that clamp over the conduit with a single screw. Drive the screw into a stud if possible; otherwise, use screw-in drywall anchors. Keep straps aligned and evenly spaced for a professional appearance and proper support.
8. Running Wire Through Conduit: Push vs. Pull Techniques
For short, straight runs with minimal bends, pushing individual THHN wires through conduit is often easier than pulling. Mount wire spools on a steel pipe or dowel so they unwind freely without tangling. Bend the wire ends slightly (not sharply—just a gentle curve) so they don't catch on fittings, and push all three wires (hot, neutral, ground) simultaneously through the conduit. Leave 12 inches of extra wire at each box for making connections.
For longer runs or multiple bends, use an electrical fish tape. Push the fish tape through the conduit from the destination box back to the source. Secure the wire bundle to the fish tape's hook using electrical tape, wrapping it smoothly so it doesn't snag. Pull the wires through slowly and steadily, using pulling lubricant (rated for electrical wire) on long or difficult runs.
9. Wiring Outlets, Switches, and GFCI Protection
GFCI Load-Side Protection
If the source outlet is a GFCI receptacle, connecting new outlets to the "load" terminals provides ground-fault protection to the entire downstream branch. Connect the incoming hot and neutral wires (from the existing circuit) to the "line" terminals on the GFCI. Connect the outgoing hot and neutral wires (going to new outlets) to the "load" terminals. This configuration trips the GFCI if any downstream outlet experiences a ground fault, protecting users from shock.
Outlet and Switch Connections
Strip 5/8 inch of insulation from wire ends. Form a hook by bending the bare copper clockwise (so it tightens rather than loosens when you tighten the terminal screw). Connect black wires to brass screws, white wires to silver screws, and green or bare ground wires to the green ground screw. Tighten screws firmly but don't overtorque and strip threads. For switch wiring, the hot wire feeds the switch and a switched hot returns to the fixture; the neutral bypasses the switch and connects directly to the fixture.
10. Grounding Metal Boxes in PVC Conduit Systems
PVC conduit doesn't conduct electricity, so metal boxes and fixtures won't be grounded unless you explicitly bond them to the equipment grounding conductor. At each metal box, connect the green or bare ground wire to a green grounding screw threaded into a tapped hole in the back of the box. If no tapped hole exists, use a grounding clip that clamps onto the box edge and accepts the ground wire.
At light fixtures, connect the ground wire to the fixture's ground screw or ground wire pigtail. This ensures that if a hot wire contacts the metal enclosure, fault current flows through the ground wire back to the panel, tripping the breaker and preventing shock. Skipping this step is a code violation and a safety hazard.
11. Adding Ceiling Lights and Fluorescent Fixtures
Ceiling Box Installation
For ceiling-mounted lights, install a 4-inch square metal box with an appropriate fixture-rated cover. Use toggle bolts if mounting to drywall between joists, or screw directly into joists when possible. Run conduit from the wall switch box to the ceiling box, using 90-degree elbows to turn corners and supporting the vertical and horizontal runs with straps.
Fluorescent Fixture Wiring
Many shop-style fluorescent fixtures include knockouts for conduit entry. Remove the knockout with snips, install a male adapter, and connect the conduit. Strip the fixture wires and connect them to the circuit wires using wire nuts: white neutral wires together, black or colored hot wires together, and ground wires bonded to the fixture housing with a grounding screw. Install the fixture cover, insert fluorescent tubes or LED replacements, and test operation.
12. Testing, Inspection, and Final Checkout
Before turning the breaker back on, visually inspect all connections for bare wire showing outside wire nuts, loose terminal screws, or ground wires not bonded to boxes. Ensure all boxes have covers installed and conduit runs are securely fastened. Turn the breaker on and test each outlet with a plug-in GFCI tester, which will indicate correct wiring, open ground, open neutral, hot-neutral reversed, or other faults. Test GFCI function by pressing the test button—the outlet should trip immediately.
If you pulled a permit (required in most jurisdictions for electrical work), schedule the final inspection before closing up any walls or ceilings. Inspectors verify proper grounding, correct wire sizing, adequate box fill, proper GFCI protection, and secure conduit support. Address any noted deficiencies before finishing the space.
Frequently Asked Questions
How many outlets can I add to an existing 15-amp garage circuit?
For continuous loads, limit to 1,440 watts (80% of 1,800 VA capacity). Using the conservative 180 VA per receptacle calculation, that allows approximately 8 outlets. Residential garage circuits often don't follow this rule, but it provides a safe margin.
Can I use 14-gauge wire on a 20-amp circuit if I'm only adding a few outlets?
No. Wire gauge must match the breaker size, not the anticipated load. A 20-amp breaker requires 12 AWG wire minimum. Installing a 20-amp breaker on 14-gauge wire creates a fire hazard because the wire will overheat before the breaker trips.
Do I really need to run a separate ground wire with PVC conduit?
Yes. PVC doesn't conduct electricity, so metal boxes and fixtures won't be grounded unless you pull a dedicated green or bare copper ground wire and bond it to every box and fixture. Skipping this step violates code and creates shock hazards.
How far apart should I space PVC conduit straps?
Straps must be within 36 inches of every box and spaced no more than 36 inches apart along straight runs. This prevents sagging and ensures the conduit stays securely fastened.
Can I add outlets to an existing circuit without a permit?
Most jurisdictions require permits for electrical work beyond simple device replacement. Pull a permit so an inspector can verify your work meets code. This protects you legally and ensures the installation is safe.
What's the difference between PVC electrical conduit and PVC plumbing pipe?
PVC electrical conduit is manufactured to tighter tolerances, has smooth interiors to prevent wire damage, and uses electrical-rated cement. Plumbing PVC may have rougher interiors and isn't rated for electrical use. Always use conduit labeled for electrical applications.